 |
| Self shot in mirror with DIY ringflash |
One of the things about macrophotography is that you either have to shoot wide open (and have a depth of field of about 1 micron or so) or stopped down to get some decent DOF (but have ridiculous shutter speeds making everything a blur). The solution: put a strobe on it! Given that you are so close to your subject, it's hard to properly light it. A ringflash is a good choice and at the tiny distance it is used from the subject, it has the effect of a large softbox creating even lighting.
Now, I already salvaged an old strobe for free, surely enough this can be transformed into a ringflash! A quick search on the interwebs show lots of DIY ringflash designs. Some use two reflecting bowls, other shoot through a diffuser, and a particulary nice design used a pizza box and some styrofoam. I was going for a diffuser approach because I knew I had just the right thing laying around:
 |
| Bucket: before and after |
On the right you see the ring of my ringflash. On the left is an original bucket the ring was made from. It originally contained food (the stuff they smear on sandwiches) and you can probably find similar buckets in you local sandwich shop. A small rant of decadence here: these buckets are really high quality, with a thick and sturdy wall and bottom. It sickens me that they are produced only to be used once to hold (for a small amound of) food and then dumped in the garbage en masse. Seriously, the decadence!
Anyway, here is an inside view of the actual ring:
 |
| Inside of buckets |
 |
| The inside, covered with shiny aluminium foil. |
As you can see, it contains a tube in which to insert the lens. This tube is made from a Pringles can. It's pretty sturdy and has exactly the right diameter to fit the 18-55mm kitlens and my 55-250mm tele! The side of the ring also contains a "window" for the strobe head. The sides of the bucket and the side of the Pringles can are covered in aluminium foil to reflect as much light as possible. The bottom of the bucket is left untouched, this is where the (diffused) light will come through.
Test shot with the lid off:
 |
| Reflection of the light. Front of ringflash is laying down, bottom up. |
You can see the lid of the bucket next to it, also covered in aluminium foil. Below you can see the effect of this lid on the distribution and intensity of the light produced by the flash. Both images were made with the same settings (and some epic shutter drag).
 |
| Without lid on the back |
 |
| With lid |
As you can see, the lid really makes a difference. Small note: my flash only has a wide angle setting. If you have a strobe that can be adjusted from wide to tele, you'd probably want to use the wide setting to get as much light as possible "around" the ring.
Now it was only a matter of mounting the ring to the flash and the camera. A bit of aluminium plating bent into a bracket did the trick.
 |
| Flash mounted on bracket |
The camera attaches to the end of this bracket, with the lens facing down in the tube of the ringflash. This puts the flashhead directly in side the window.
In hindsight: I should also have attached the bracket to the lid of the ring itself, instead of simply connecting the camera and strobe and letting the ring "rest" on the lens. It's something I can still do later.
One last thing worth mentioning when I tried to use a screw to attach the camera to the bracket: I live in Belgium, Europe. In here we have the (sensible) metric system. I only have bolts with a metric speed, and it turns out that a camera tripod mound uses imperial-based bolts. I could, however get a metric bolt in for about three quarters of a turn. It's not the safest thing to do (twist it to hard and you break the wire of the bolt/nut, don't fasten it hard enough and your flash falls off). It works for now, but I should probably find some imperial bolts if I continue using this setup.
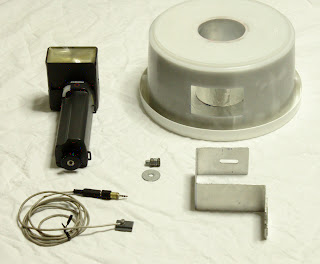
In summary, complete "system":
 |
| All the pieces spread out |
I haven't found the time to make some decent macro shots with the ringflash. And given that (judging by the weather) it's rapidly turning into winter, I'm afraid I won't have much time left to try and surprise some tiny critters with my ringflash.
I could, however, test the flash by using it for that other, typical, technique: to shoot a portrait:
 |
| First victim I could find: my mom |
You can clearly see the circular catchlight in her eyes, and the (diffuse!) shadow that follows the contours of her head in the wall behind her.
Given the small diameter of the ring, I had to get pretty close with a short focal length or else the catchlights would have been too tiny to see (it's a macro ring, after all). This small subject distance also adds to the diffuseness of the shadow on the background.
To conclude, I've enhanced my $0 strobe to a $0 ringflash. It was fun doing so, and I hope it'll be lots of fun to hunt some bugs with it, and blind the crap out of them!
Roald strikes again.
ReplyDeleteThe Best Casino Sites of 2021 | Wooricasinos.info
ReplyDeleteHere's everything you need 토토사이트직원모집 to know 승부사 온라인 환전 about the casino site 벳 365 우회 that's on the list. Learn about 188bet their 케이 뱃 games, safety, banking options and much more.